Wednesday, August 24, 2016

Baby Cards

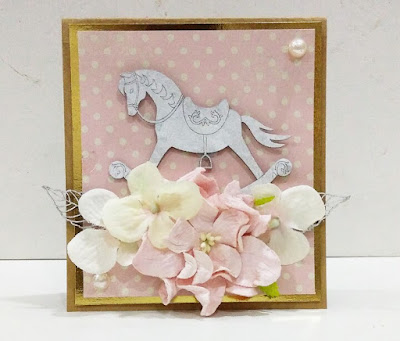
Hello there! I'm here to share a couple of cards with you wonderful Scrapmatts fans!


Here's how I made it:
1) Cut a cardstock to 5x10
2) Fold in half
3) Cut out gold foil cardstock to a slightly smaller size and adhere onto cardstock
4) Cut patterned paper to slight smaller size that the gold foil card and adhere to the gold foil card
5) Dab distress paint onto the chipboard of your choice and leave to dry
6) Arrange flowers and other embellishments around the chipboard

Using:


Wednesday, May 4, 2016

Prima Projects

Hi there, here are some Prima based projects I'd like to share.

They're taken off my Instagram account: 

https://www.instagram.com/sharm_nidyanandan


Sunday, March 13, 2016

Graphic 45 Design Team Audition 2016

Hi there dearies!! This is my first time auditioning for the G45 DT. 

As part of their requirements, I'd like to share some projects I have created using their awesome range of products!

Here they are:


Part of the requirement from the DT call is to also include a tutorial. Kindly follow the link below to know how I made the Magentic Closure Mini Album:

Magnetic Closure Mini Album Tutorial

Now to sit back and keep my fingers and toes crossed lol!!

Thank you for stopping by my page lovely people!

Monday, April 20, 2015

Prima Projects Galore!

Well, I'm absolutely certain my blog title just gave it away *lol*!! I'm here today (after a long hiatus at that) to share some projects I've made using Prima products over the years I've been scrapbooking. There's something about Prima that keeps one spellbound and definitely in awe.

Prima, like many of us, has come a long way. From simple, general scrapbooking and card making, it now caters for beginners to the ever famous mixed media enthusiats! I shall not take up more time, do have a look at what I have to share! ;)

And stop by my pinterest board for more!
Prima Marketing Products Projects


Tuesday, January 6, 2015

Thankful for You

Today I'm sharing with you lovely crafters on how the Happy Camper & Friendly Forest lines go so well together. As the theme for the projects revolve around being thankful, I'd like to share with  you'll a layout I created featuring the two blessings in my life, my baby girls :) I am thankful for having them in life. They bring immense joy and never fail to lift my spirits on a trying day. Here's my layout featuring them..


Some Close Ups


Materials Used:

4364: friendly forest this & that sticker
4370: friendly forest icon sticker 
4371: friendly forest fancy frill sticker
4436: fall mini clothespins 
4327:fall festival double-sided cardstock
4477: happy camper this & that sticke
4475: happy camper icon sticker
4486: field of flowers double-sided  cardstock


Altered Notebook

Hello there! Sharm here to share with you a notebook I altered using the lovely chipboard frame by I Kropka and Prima Marketing Papers.

I basically cut a 4x6piece of patterned paper, adhered it to the cover of the notebook.

Then, I picked out the frame of my choice and removed the centre oval piece. I decorated that piece with a cut out image of the fairy and further worked on the vines and flourishes of the frame by applying acrylic paint, twinkling h2os and silks.

Once dried, I placed in onto the front cover and went on to embellish with handmade flowers and fussy cut details.

Here are some pics on what my project looks like:


Materials Used: 

OWLove - frame # 2 medium symmetric

Prima Marketing Patterned Paper & Stamp
Silks
Twinkling H2O
Pearls
Distress Inks


hanger

Hi there chipboard lovers and fellow crafters! :) As you indulge in a warm cup of cocoa while you do some blog hopping, I have a little altered project to share with you today. You know those little, teeny tiny hangers that come with children's clothes? Well, I have turned it into a photo hanger!

It took quite a bit of work to put this into place, but I completely love the end result and I hope you will too!

Just to share how I made it:

1) I picked out the chipboards that I wanted to use. I used gesso on them and for those that I wanted to further decorate, I applied mod podge and dipped in a bowl of glitter. I also topped it off with glitter paint by Martha Stewart and Distress Paints
2) I cut a piece of metal chain into 2
3) Next, I attached one end to the hanger, while at the other, I added little wooden pegs
4) I embellished some transparent photo frames by Crate Paper with some ephemeras from Maggie Holmes' Open Book Collection
5)  Lastly, I added the photos to the pegs!


Here's my project in pictures:


Materials Used: